Custom Image in Windows 365
Windows 365 simplifies Cloud PC provisioning, but sometimes, the out-of-the-box images don’t quite fit the bill. That’s where custom images come in. Whether you need pre-configured apps, specific security baselines, or a Windows Insider Preview build for testing, custom images give you full control over your Cloud PC deployments.
I recently had to use a custom image while testing a Windows 365 preview feature that required an Insider Preview build—something not available in the default gallery images.
This approach is especially useful when:
- Testing Preview Features: Some Windows 365 previews require Insider builds, which aren’t available in standard images.
- Pre-Configured Environments: Avoid post-deployment setup by bundling apps, configurations, and policies directly into the image.
- Security & Compliance: Enforce specific hardening measures and pre-install security tools tailored to your organization.
- App Compatibility Testing: If your business apps require certain OS configurations, a custom image ensures they work consistently.
By using custom images in Intune for Windows 365, you get a streamlined, repeatable process that ensures consistency across deployments while meeting unique business requirements.
Requirements for using custom images
Before deploying a custom image in Intune for Windows 365, you need to ensure it meets the requirements. Here’s what you need:
1. Supported OS Versions
- Windows 10 or Windows 11 Enterprise (Pro editions are not supported).
- Insider Preview builds can be used but require manual updates.
2. Image Format & Disk Type
- The image must be in VHD (Virtual Hard Disk) format.
- Fixed-size VHD is required (not dynamic or VHDX).
3. Image Preparation
- The image must be generalized using Sysprep (
sysprep /generalize /oobe /shutdown). - Must be configured for Azure Generation 2 VM (UEFI boot).
- Should not include built-in local accounts (Windows 365 requires Azure AD join or Hybrid AD join).
4. Azure Storage & Permissions
- The VHD must be uploaded to an Azure Storage Account (Blob Storage).
- Intune Admin, Windows 365 Admin, or Global Admin roles are required to assign custom images in Intune.
5. Licensing & Subscriptions
As you can see you need an active Azure subscription with the right compute and storage resources to host the image. A Windows 365 Enterprise license is required (custom images are not supported in Windows 365 Business).
Build the image and prepare for Azure
Before creating a custom image, you need an ISO can be downlooaded from Microsoft on multiple sites. Make sure you have set up Hyper-V on your computer. I am running it on my Surface with SnapDragon 🙂
Create a New Virtual Machine in Hyper-V
- Open Hyper-V Manager and select your host machine.
- Click New → Virtual Machine, then follow the wizard.
- Specify the VM name (e.g., Win11-Custom-W365 or whatever).
- Set the Generation: Select Generation 2.
- Allocate Memory:
- Assign at least 4GB RAM.
- Enable Dynamic Memory to optimize performance.
- Configure Networking:
- Choose an existing Virtual Switch (Not Connected, External or Default Switch for internet access).
- Create a Virtual Hard Disk (VHDX):
- Set the size to at least 64GB (fixed size for better performance).
- Attach the Windows 11 Insider ISO:
- Under “Installation Options,” select Install an OS from a bootable image file and browse for the ISO you downloaded.
- Disable Checkpoints in settings of the VM.
- Start the VM and boot from the ISO.
Click Finish to create the VM.
Install Windows 11
- Start the VM and boot from the ISO.
- Follow the Windows 11 setup process, selecting your desired:
- Language, time, and keyboard settings.
- Edition (Ensure it’s the edition compatible with Windows 365, e.g., Windows 11 Enterprise).
- Complete the Out-of-Box Experience (OOBE):
- The image must never have been Active Directory, Microsoft Entra ID joined, Intune-enrolled, or enrolled for co-management.
- Its possible to setup the device without internet. Hit Shift+F10 before connecting to Internet. In the cmd windows run OOBE\BYPASSNRO. You will also get the alternative if you disconnect the virtual switch.
- Once installation completes, install updates and restart the VM.
Customize the Image
Before generalizing the image for deployment, you may want to install applications, apply settings, and optimize the image.
- Install required apps.
- Apply Windows Updates to get the latest Insider build patches. (do not forget to change virtual network to external or default)
- Install any enterprise-specific tools (security, monitoring, VPNs, etc.).
- Remove unnecessary apps using PowerShell:
Get-AppxPackage | Where-Object { $_.Name -like “Xbox” } | Remove-AppxPackage - Disable Background Apps:
reg add HKCU\Software\Microsoft\Windows\CurrentVersion\BackgroundAccessApplications /v GlobalUserDisabled /t REG_DWORD /d 1 /f - Reboot
Generalize the Image with Sysprep
Before capturing the image for Azure, you need to generalize it using Sysprep.
- Open Command Prompt (Admin) inside the VM.
- Run the following command:
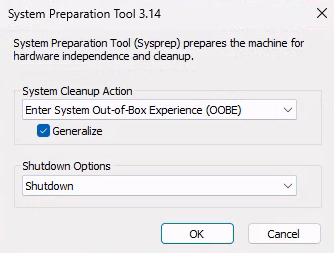
C:\Windows\System32\Sysprep\sysprep.exe - In the System Preparation Tool window:
- Select Enter System Out-of-Box Experience (OOBE).
- Check Generalize.
- Set Shutdown Options to Shutdown.
- Click OK.
The VM will shut down once the process is complete.

If you get issues when running sysprep.exe look at the log file in c:\Windows\system32\sysprep\Panther\setuperr.log. i had an error with bitlocker enabled. Had to run a command in cmd:
manage-bde -off c:
Convert VHDX to VHD (if necessary)
If you created a VHDX disk earlier, convert it to VHD:
Open PowerShell (Admin) on your host and run:
Convert-VHD -Path "C:\Hyper-V\Win11-Custom-W365.vhdx" -DestinationPath "C:\Hyper-V\Win11-Custom-W365.vhd" -VHDType FixedThe conversion process may take some time.
Now that the image is in the correct format, we need to upload it to Azure.
Uploading to Azure
Now that we’ve built and prepared our custom Windows 11 image using Hyper-V, the next step is to upload it to Azure Blob Storage. Azure Blob acts as a staging area before converting the image into an Azure-managed image for Windows 365 and Intune.
I have seen a coupkle of different ways to upload it to the blob but I use the Module AZ, that works for me.
Upload to Azure Blob storage
If you don’t have the AZ module installed, do that first
Install-Module -Name Az -AllowClobber -Scope CurrentUser -ForceThen connect to Azure
Connect-AzAccountIf you got multiple subscriptions you need to point which one out that is going to be used.
Get-AzSubscriptionSelect the appropriate subscription:
Set-AzContext -SubscriptionId "a lot of numbers and letters"Define the context for the upload
$resourceGroup = "Intune"
$storageAccount = "yourstorageaccount"
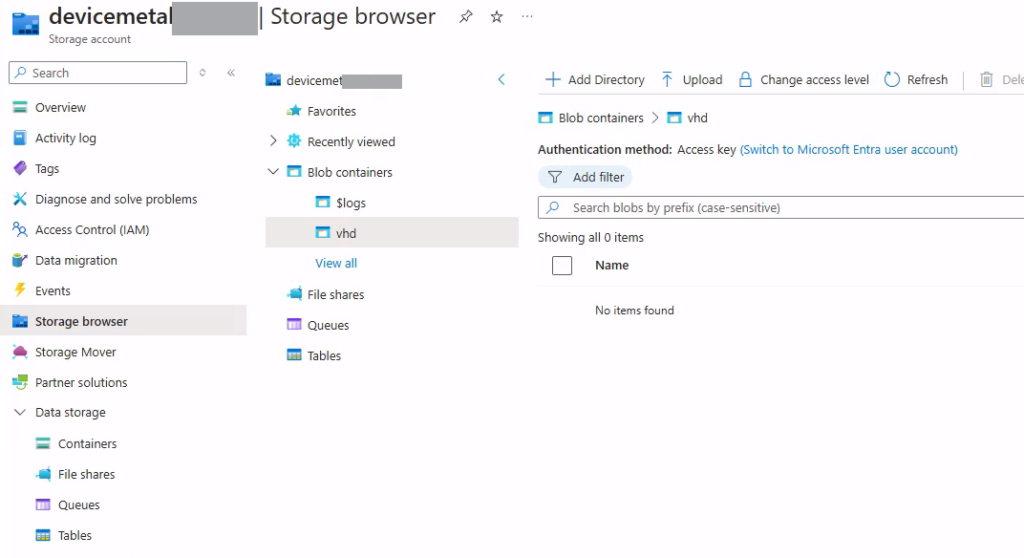
$containerName = "vhd"
$localVHDPath = "C:\Hyper-V\Win11-Custom-W365.vhd"
$blobName = "Win11-Custom-W365.vhd"
I have already prepared the blob for this

Set the storage
$storageAccountInfo = Get-AzStorageAccount -ResourceGroupName $resourceGroup -Name $storageAccountSet the context for the upload
$StorageContext=$storageAccountInfo.ContextStart the upload
Set-AzStorageBlobContent -File $localVHDPath -Container $containerName -Blob $blobName -Context $storageContext -Force -BlobType PageThe upload will take a few moments, remember its 64GB we are uploading.

Creating the Azure Image
To use the uploaded VHD as a base image for Windows 365, you must create an Azure Managed Image. Last part before we can use the image in our Windows 365 deployments is to upload it to our Intune tenant. If you keep the prompt !!! otherwise star by conencting to AZAccount.
Connect-AzAccount
Set-AzContext -SubscriptionId "a lot of numbers and letters"
Set the context
$resourceGroup = "Intune"
$imageName = "Win11-Custom-W365"
$storageAccount = "yourstorageaccount"
$containerName = "vhd"
$localVHDPath = "C:\Hyper-V\Win11-Custom-W365.vhd"
$blobName = "Win11-Custom-W365.vhd"
Get the URl for the VHD
$storageContext = (Get-AzStorageAccount -ResourceGroupName $resourceGroup -Name $storageAccount).Context
$blobURL = (Get-AzStorageBlob -Container $containerName -Blob $blobName -Context $storageContext).ICloudBlob.Uri.AbsoluteUri
Write-Output "VHD URL: $blobURL"
Create the image
New-AzImageConfig -Location "Sweden Central" -HyperVGeneration V2 | Set-AzImageOsDisk -OsType Windows -OsState Generalized -BlobUri $blobURL | New-AzImage -ImageName $imageName -ResourceGroupName $resourceGroupVerify the image
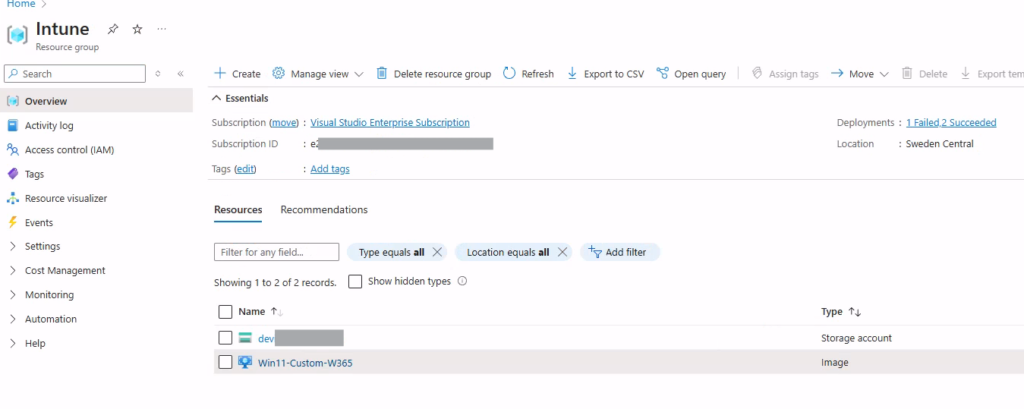
Get-AzImage -ResourceGroupName $resourceGroup -ImageName $imageNameYou can also see it in the portal on the resource group

Adding the custom Image in Intune
Last part before we can use the image in our Windows 365 deployments is to upload it to our Intune tenant. Hmm that makes it like the third time copying the image….. well anyway.
- Go into the Intune portal and head over to the Windows 365 page. Navigate to Custom Images
- Click Add -> Choose the name that will be seen in Intune.
- Set the version number. It’s for your own info. You can set whatever in the format of Major(int).Minor(int).Patch(int), where int is between 0 and 2,147,483,647 (inclusive). For example: 0.0.1, 1.5.13
- Choose the subscritption where you have the image
- Use the drop down to pick the image.

This take long time as well, not sure why but it does for me.

Finally, lets deploy the image!
Either we can create a new provisioning policy or change a current one. Note that changing a current one will not reprovision the current cloud pcs.
It’s easy. create a new policy and pick you custom image!
Wohoo, new Windows 365 cloud PCs assigned to this policy will now be
provisioned using your custom Windows image! 🙂
